Blogs

Dallas, Texas - a city known for its southern hospitality, vibrant culture, and, in the summer, extreme heat. With temperatures consistently soaring above 105 degrees, homeowners in this Lone Star State metropolis face a unique challenge: how to keep their landscaping and lawn not just alive but thriving. The relentless sun can quickly dry up your lawn, crack the soil, and turn your verdant oasis into a parched desert. But fear not; we're here to provide you with a comprehensive guide on how to care for your lawn and landscape during these scorching Texan summers. What to Look Out For: 1. Soil Moisture Management: Invest in a quality soil moisture meter to monitor moisture levels accurately. Water deeply and less frequently, preferably in the early morning or late evening to reduce water loss through evaporation. Consider adding a layer of mulch around your plants and trees to retain moisture and protect the soil from direct sun exposure. 2. Appropriate Watering Techniques: Avoid daily shallow watering, which encourages shallow root growth. Instead, water deeply but infrequently, promoting deep root development. Adjust your sprinkler system to ensure it provides even coverage without wasteful overspray. Consider a drip irrigation system for precise and efficient watering. 3. Select Drought-Resistant Plants: Opt for native or drought-resistant plant species that can endure hot, arid conditions with minimal water requirements. Group plants with similar water needs together to maximize efficiency when watering. 4. Regular Pruning and Trimming: Prune shrubs and trees to eliminate dead or diseased branches, allowing the plant to focus its energy on healthy growth. Trim grass regularly but avoid cutting it too short, as longer grass provides better shade for soil, reducing water evaporation. 5. Weed Control: Remove weeds promptly, as they compete with your plants for water and nutrients. Consider using mulch or weed barriers to prevent weed growth and conserve soil moisture. The Best Course for Maintaining a Healthy Yard: 1. Proper Lawn Care: Raise your lawnmower blades to a higher setting during extreme heat to leave the grass longer. Taller grass shades the soil, reducing evaporation. Mow your lawn less frequently and avoid cutting more than one-third of the grass blade's height at once. 2. Adequate Fertilization: Fertilize your lawn and plants appropriately to ensure they have the nutrients they need for strong growth, but avoid over-fertilizing, which can stress plants in extreme heat. 3. Smart Watering Practices: Invest in a programmable irrigation system with weather sensors that adjust watering schedules based on current conditions. Implement a rain barrel or harvesting system to collect and reuse rainwater when possible. 4. Shade and Windbreaks: Consider planting shade trees strategically around your yard to provide relief from the harsh sun. Install windbreaks, such as fences or shrubs, to reduce the drying effects of hot winds on your plants. 5. Landscape Design: Plan your landscaping layout with consideration of sun exposure and microclimates. Place more delicate plants in shadier areas. Use hardscaping elements like gravel paths and stone patios to reduce the overall area that needs watering. Conclusion: In the sizzling crucible of Dallas's summer heat, maintaining a lush, vibrant lawn and thriving landscape can be a formidable challenge. However, armed with the right knowledge and practices, you can not only survive but also thrive in these extreme conditions. Remember to monitor soil moisture, adopt smart watering techniques, choose drought-resistant plants, and regularly maintain your lawn and landscape. By following these guidelines, you'll be better equipped to keep your outdoor oasis green and healthy even when the mercury soars past 105 degrees. Your lawn and garden will not only withstand the heat but also become a refreshing haven in the midst of a scorching Texan summer.

Ah, the pitter-patter of raindrops—nature's symphony. While rainfall nourishes our gardens, too much of a good thing can bring a host of challenges to our cherished landscapes. Here are some common landscaping tips and issues that may arise during extended periods of rain: 1. Drainage Problems: When the rainclouds go into overdrive, it's crucial to address drainage issues to prevent your garden from turning into a mini-waterpark. Poorly drained areas can suffer from soil erosion, water-logging, and unhappy plants. To combat this, ensure your property has proper drainage systems in place. Consider incorporating French drains or constructing rain gardens. These features will help redirect the flow of water away from vulnerable spots, keeping your landscape high and dry. 2. Soil Erosion As the rain cascades down, the force of the water can wash away precious topsoil, leaving your garden looking like a barren wasteland. Fear not, as the best and simplest solution is: mulch ! Spread a layer of organic mulch, such as wood chips or straw, to protect your soil from erosion. Mulch acts as a cozy blanket, stabilizing the soil and retaining moisture, all while adding an aesthetically pleasing touch to your landscape. 3. Plant Health Issues: Rainy seasons can be a breeding ground for root rot and fungal diseases that make plants as happy as a wet cat. To keep your leafy friends in good health, ensure proper drainage in their growing areas. Avoid overwatering and use well-draining soil to prevent waterlogged roots. In the battle against plant diseases, swift action is key. Trim and dispose of any damaged or diseased plant parts to prevent the spread of these unwelcome guests. 4. Weeds and Pest Problems: Rainfall provides ideal conditions for weed proliferation. Combat unwanted weed growth by implementing a proactive approach to weed control. Regularly inspect your landscape and promptly remove any weeds that emerge. Mulching garden beds and applying pre-emergent herbicides can help suppress weed growth during the rainy season. 5. Slopes and Slips: If you have slopes or hillsides on your property, heavy rainfall can increase the risk of erosion and landslides. Planting ground covers, installing retaining walls, or terracing can help stabilize slopes and minimize erosion. 6. Rain Sensors and Overwatering: We can't forget the heroics of Hunter Irrigation Controllers and their trusty rain sensors. Like vigilant guardians, these controllers possess the power to shut off the irrigation system at the mere whisper of rain. No more wasteful water dances in the rain! Overwatering becomes a distant memory as your garden receives only the moisture it truly needs. The harmony between technology and nature, a duet of water-wise wonders! Understand the signs of overwatering, such as wilting or yellowing leaves, and adjust your watering accordingly. Remember, moderation is key! Allow the soil to dry slightly between watering sessions, giving your plants a chance to breathe. With your newfound watering prowess, you shall conquer overwatering and cultivate a garden of boundless beauty. Conclusion: Rainy days can be a cause for celebration, as they bring life and vitality to your landscape. However, they also present unique challenges. By implementing the right strategies, you can navigate the pitfalls of excessive rainfall with confidence. Remember to address drainage problems, protect against soil erosion with mulch, and pay attention to plant health and pest issues. Maximize the effectiveness of your irrigation system with rain sensors, preventing overwatering and promoting water conservation. Finally, keep your soil nutrient-rich and stabilize any slopes or hillsides. With these landscaping tips and solutions, you'll be well-prepared to embrace the rain, ensuring your garden flourishes even during the wettest of seasons. So go ahead, let the raindrops dance, and watch your landscape thrive in the face of watery challenges.
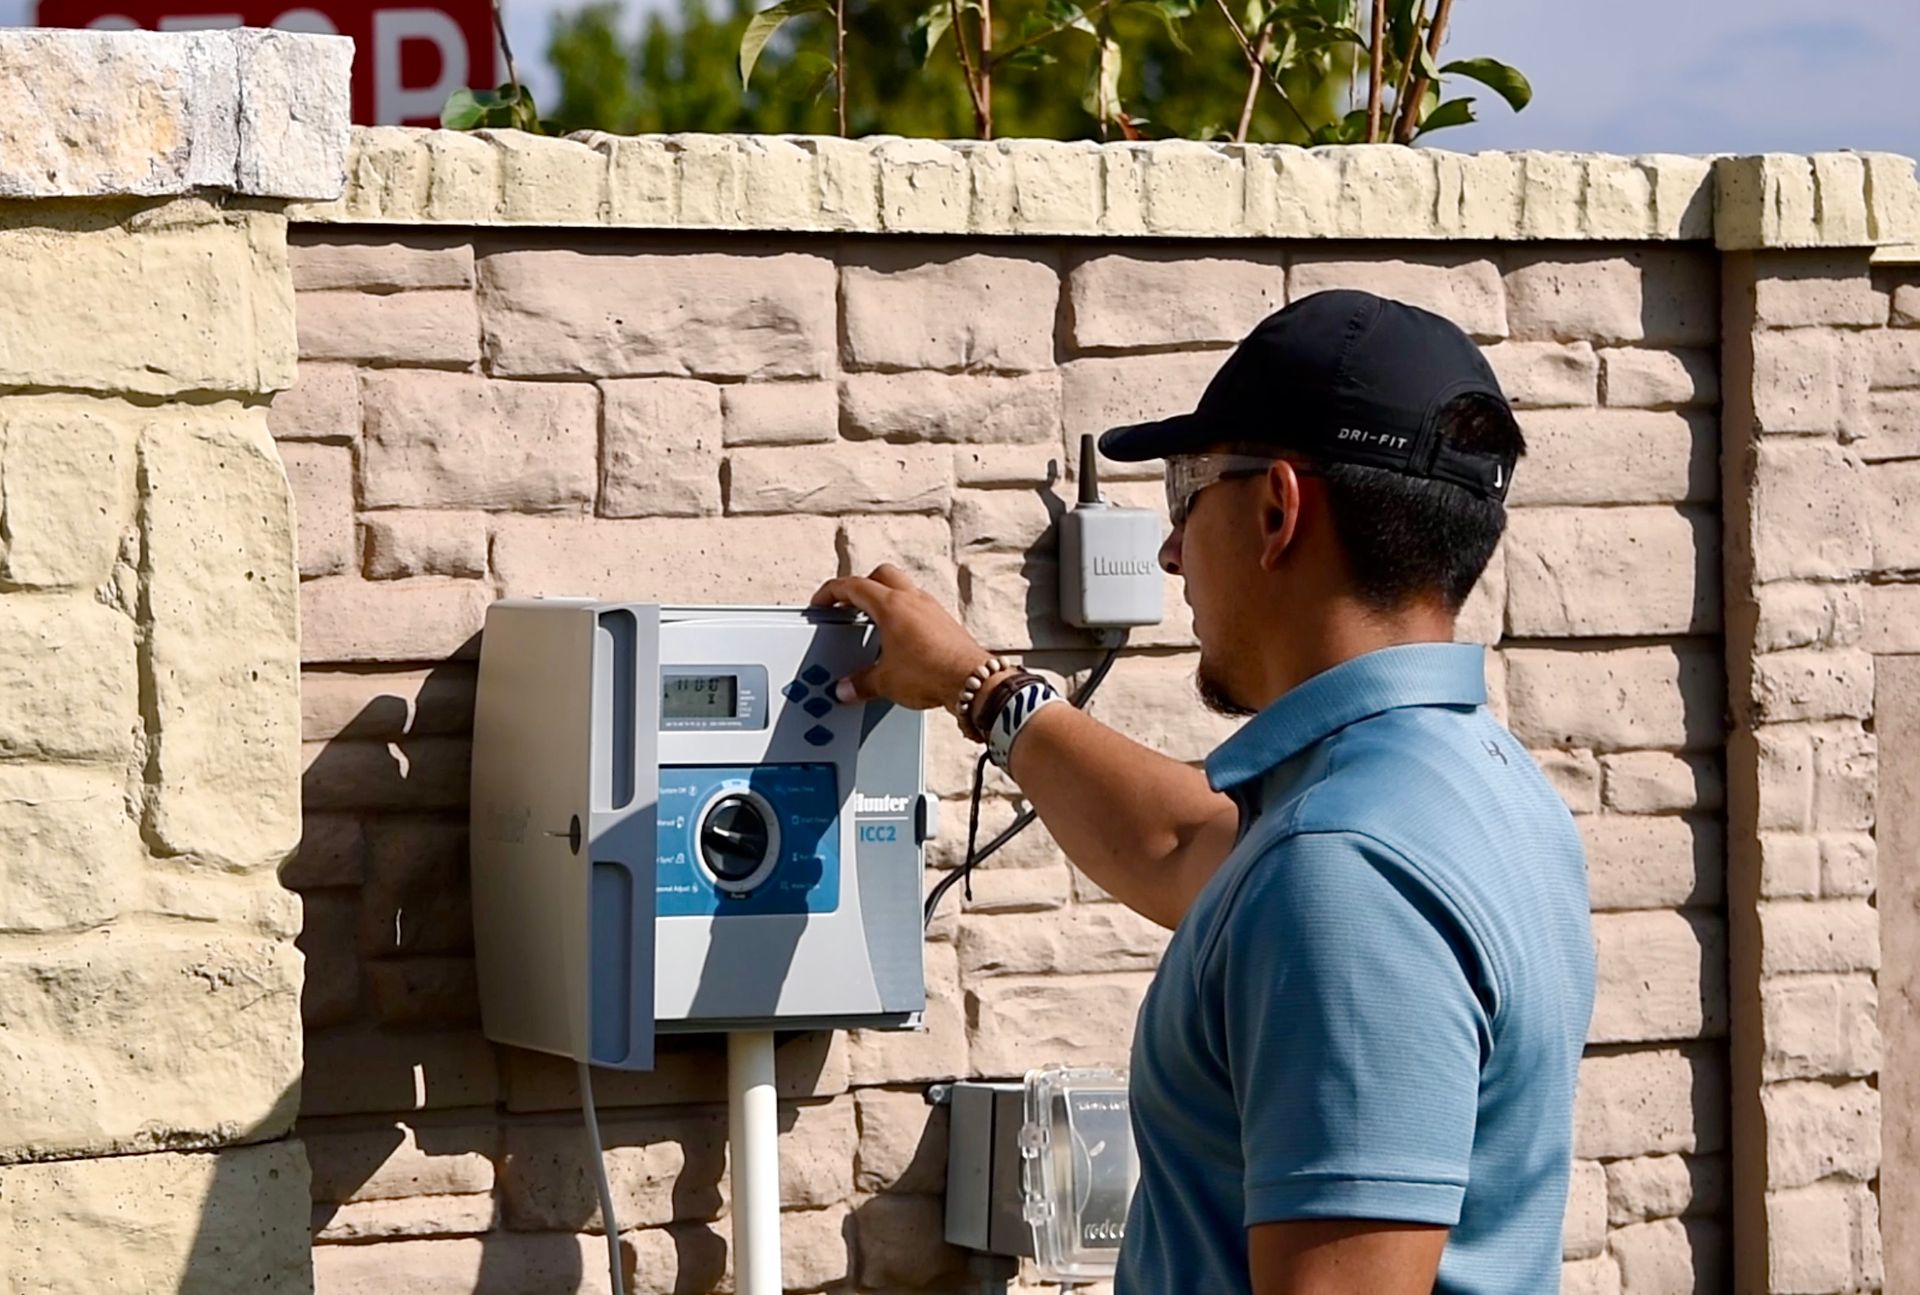
As a new homeowner, setting up and programming your Hunter irrigation controller can seem daunting, but it doesn't have to be. With a few simple steps, you'll be able to set up your watering schedule and keep your lawn and plants healthy and green all season long. Step 1: Set the Date/Time To set the date and time on the Hunter X2 controller, start by locating the "DATE/TIME" switch on the controller. It will be labeled and have a clock symbol. Press the "DATE/TIME" button to enter the date and time setting mode. Look for buttons with arrows or symbols that indicate "up" and "down". These buttons will help you adjust the values. Press the "up" or "down" button to select the correct year . Keep pressing until you reach the right year. Next, choose the correct month by pressing the "up" or "down" button. Keep pressing until you reach the desired month. Then, select the specific day of the month using the "up" or "down" button. Keep pressing until you reach the correct day. After setting the date, choose the current hour by pressing the "up" or "down" button. Continue pressing until you reach the right hour. Use the "up" or "down" button to set the current minute . Keep pressing until you reach the correct minute. Once you have set the time, press the "DATE/TIME" button again to save your changes . Congratulations! You have successfully set the date and time on your Hunter X2 controller. Remember, if you ever need to adjust the date or time in the future, simply follow these steps again. It's important to have the correct date and time on your controller to ensure accurate scheduling of your irrigation system. Step 2: Set the Start Times The "start time" is the specific time you want your irrigation system to begin watering your lawn or garden. It's like setting an alarm clock for your sprinklers to start working. After setting the date and time as explained earlier, move the switch towards the "START TIME" option on the controller. Now, using the "up" or "down" buttons, adjust the hour to the desired start time for your irrigation system. Press the right arrow to move on to "minutes" After setting the hour, use the same "up" or "down" buttons to adjust the minutes . Keep pressing until you reach the desired minutes. Once you have set the start time, press the appropriate button to confirm and save your changes. By setting the start time, you can ensure that your irrigation system operates at the most suitable hours for your lawn and plants. This can help prevent water loss due to evaporation during the hottest parts of the day and allow for efficient water absorption by the soil. Now you have successfully set the date, time, and start time on your Hunter X2 controller, which will contribute to maintaining a healthy and well-watered landscape. Step 3: Set the Run Times The "run time" refers to the duration or length of time that your irrigation system will water your lawn or garden during each watering cycle . It's important to set an appropriate run time to ensure that your plants receive sufficient water without wasting excess water. To set the run times, follow these steps: After setting the start time, move the switch towards the "RUN TIME" option on the controller. Now, using the "up" or "down" buttons, adjust the run time to the desired duration for your watering cycle. Keep pressing until you reach the desired hour, which should be set to "0". Press the right arrow to set the minutes, which should be around "10" minutes of run time. Once you have set the run time, press the right arrow to confirm and save your changes. It's important to consider several factors when determining the appropriate run time for your irrigation system. These factors include the type of plants you have, the soil type in your garden, and the local weather conditions. Generally, most lawns require about 1 inch of water per week, including rainfall, so you can divide this amount across your watering cycles to determine the run time. However, it's important to monitor your lawn and plants regularly to ensure they are receiving adequate water. If you notice signs of overwatering or under-watering, you can adjust the run times accordingly. Now you have successfully set the date, time, start time, and run times on your Hunter controller. Let's move on to the next step! Step 4: Set the Water Days The "water days" refer to the specific days of the week when your irrigation system will operate and water your lawn or garden. This feature allows you to customize the watering schedule based on your landscape's needs and any local watering restrictions. To set the water days on your, follow these steps: Move the switch towards the "WATER DAYS" option on the controller. Now, using the "up" or "down" buttons, select the desired days of the week for your watering schedule. We recommend Monday, Wednesday, and Friday. Press the appropriate button to confirm each selection. Once you have set the water days, press the appropriate button to confirm and save your changes. Setting the water days allows you to establish a consistent and efficient watering schedule. It helps ensure that your lawn and plants receive water at the right intervals while preventing excessive water usage. These settings work together to create a customized and efficient irrigation schedule tailored to your landscape's specific needs. Rain Sensor We install a rain sensor with your Hunter controller as it helps conserve water by preventing unnecessary irrigation during or after rainfall. A rain sensor is a device that detects when it's raining and automatically shuts off your irrigation system. It's usually located on the side roof of your garage . Ensure it's well-mounted and unobstructed . Bypass Switch The "bypass" switch is a useful feature on the Hunter controller that allows you to manually override or bypass the programmed watering schedule. When the bypass switch is activated, the controller temporarily suspends the automatic watering cycles and allows you to manually operate the sprinklers. The bypass switch is handy in situations where you may need to water your lawn or plants outside of the regular schedule or if you want to perform maintenance on your irrigation system. By activating the bypass switch, you have control over when and how the sprinklers operate, giving you flexibility and convenience. To activate the bypass switch, simply locate the switch or button on the controller that is labeled "BYPASS" or "MANUAL". Press the switch to activate the bypass mode, and the controller will halt the automatic watering cycles. When you're ready to resume the programmed schedule, simply deactivate the bypass switch. Regularly Monitor Your System Regularly monitoring your irrigation system can help you catch any issues early on and prevent damage to your lawn and plants. Check your system regularly to make sure it's working properly, and don't hesitate to call in a professional if you notice any issues. In conclusion, Setting up and programming your Hunter irrigation controller doesn't have to be a complicated process. By following these simple steps and tips, you can keep your lawn and plants healthy and green all season long. Remember to adjust your schedule based on the weather, water deeply and infrequently, and regularly monitor your system to ensure it's working properly. With a little bit of effort and attention, you can enjoy a lush and beautiful landscape all year round.
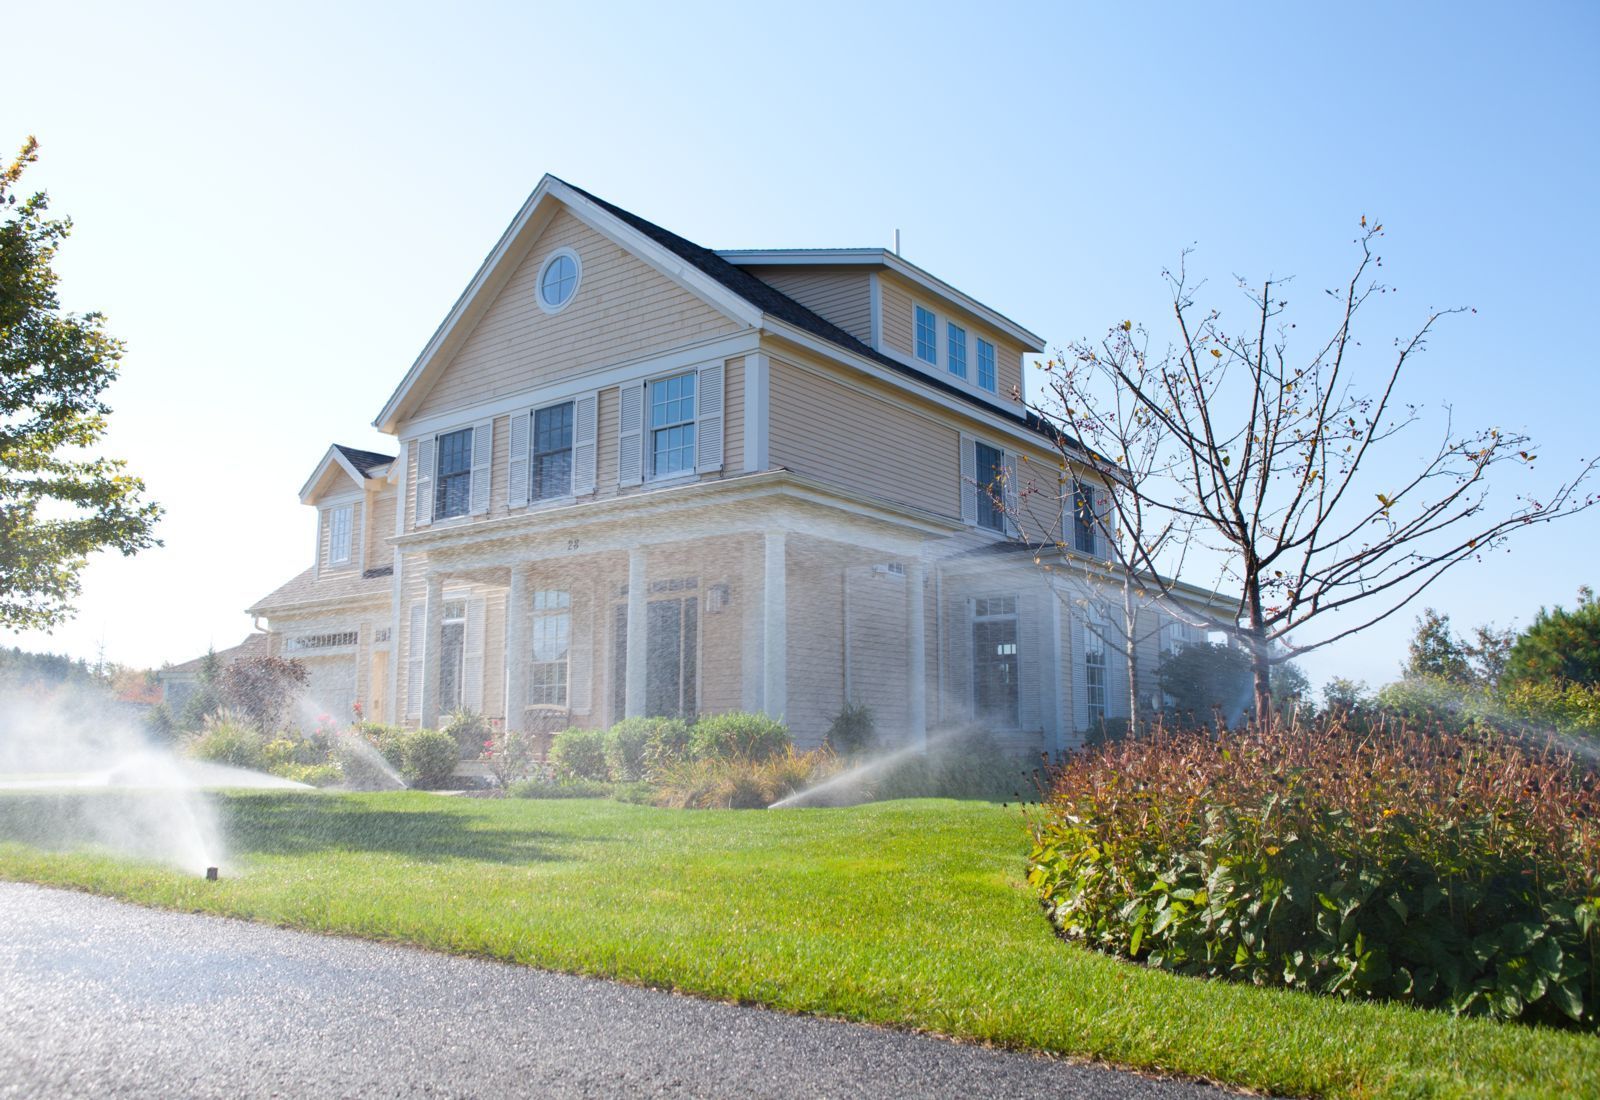
When it comes to maintaining a healthy and vibrant lawn, watering is crucial. However, if you're relying solely on manual watering methods like sprinklers or hoses, you may be missing out on the benefits of an irrigation system. While it may seem like a significant upfront investment, the long-term benefits of installing an irrigation system will ultimately save you money and time. Saving Time Firstly, let's consider the most obvious cost: your time. If you're manually watering your lawn, you're likely spending a significant amount of time dragging hoses, moving sprinklers, and adjusting water pressure. This time could be better spent enjoying your lawn, relaxing with a cold drink in hand, or tackling other household tasks. With an irrigation system, you'll save time, effort, and even water. Plus, you can program the system to turn on and off at specific times, allowing you to set it and forget it. Water Conservation In addition to saving time, an irrigation system can help reduce your water usage and water bills. With manual watering methods, it's easy to overwater, which not only wastes water but can also lead to soggy grass, mold growth, and other problems. Irrigation systems are designed to deliver just the right amount of water to your lawn, ensuring that it's healthy without wasting water. This is particularly important in drought-prone areas where water conservation is critical. Consistent Schedule Another factor to consider is the overall health and beauty of your lawn. With an irrigation system, you'll be able to provide your lawn with consistent and even watering. This will help promote healthy root growth, reduce the risk of disease and pests, and keep your lawn looking lush and green all season long. In the long run, this can save you money on lawn treatments and other maintenance expenses. Invest Now, Save Later Now, let's talk about the elephant in the room: the upfront cost of installing an irrigation system. While it may seem expensive at first, it's important to remember that this is an investment in your home and your quality of life. You'll be able to enjoy a beautiful, healthy lawn without spending hours every week manually watering it. Plus, with the water and maintenance savings, the system can eventually pay for itself. Home Value Additionally, an irrigation system can increase the value of your home. Many homebuyers are attracted to properties that have well-maintained lawns and landscaping. By investing in an irrigation system, you're not only improving your quality of life but also potentially increasing your home's resale value. In Conclusion Installing an irrigation system may seem like a significant investment upfront, but the long-term benefits will save you time, water, and money. With a healthy, vibrant lawn, you'll be able to enjoy your outdoor space and increase the value of your home. So why wait? Invest in an irrigation system now and start reaping the rewards.

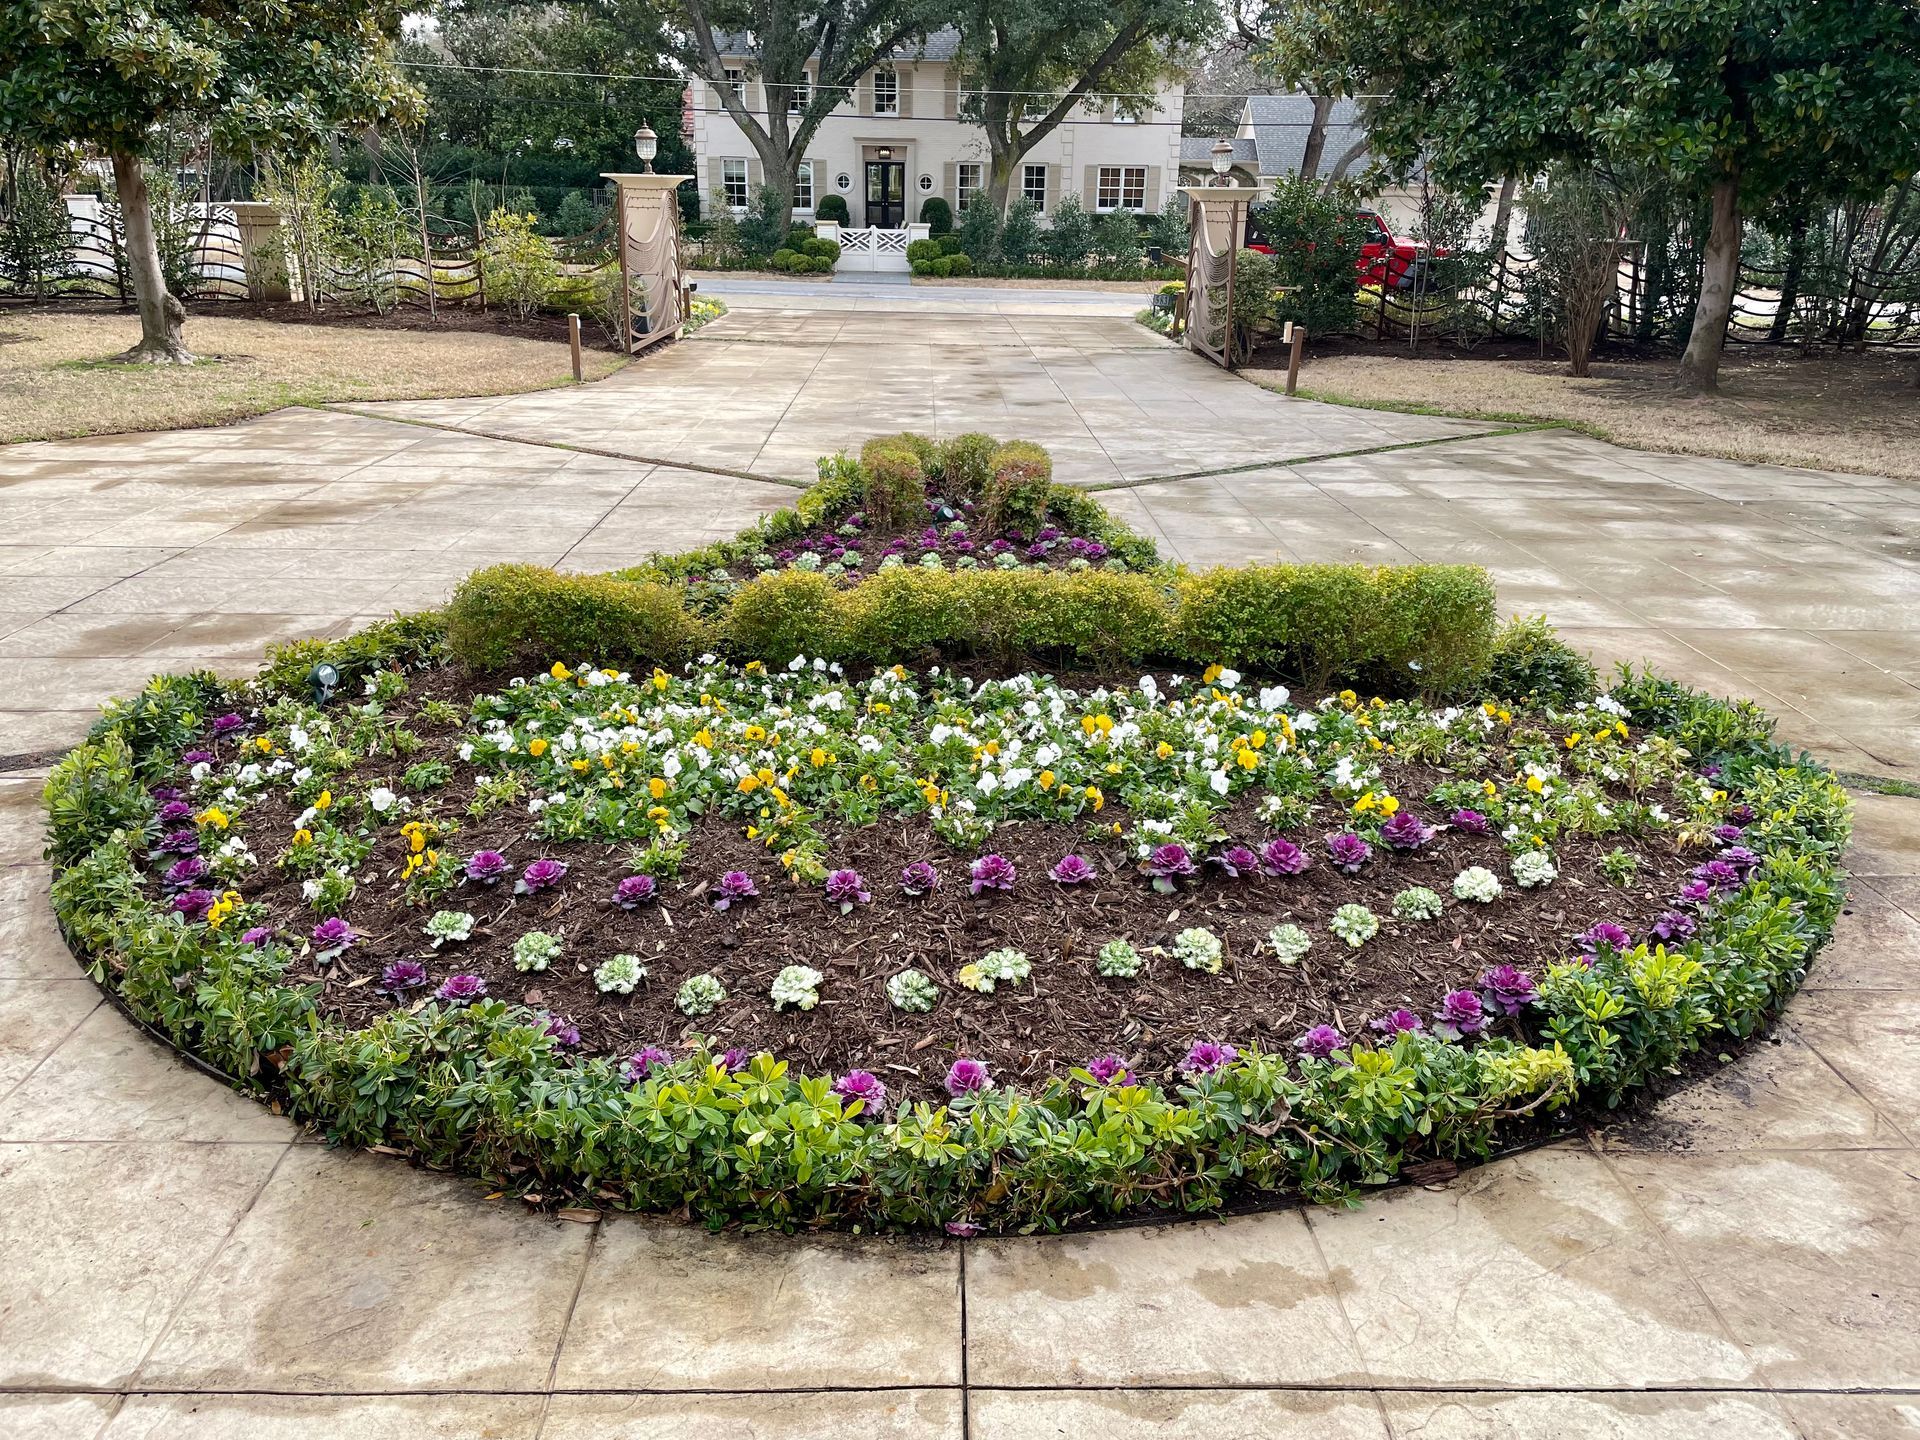
Spring has sprung and it's time to refresh your flower beds with a burst of colorful plants that will bloom throughout the hotter months ahead. Whether you're a seasoned gardener or just starting out, there are a few things to keep in mind when planning your Spring color change. First and foremost, you want to choose plants that are suited to your climate and soil conditions. Take a trip to your local nursery or garden center and chat with the experts about what plants will thrive in your area. Some great options for Spring color include pansies, tulips, daffodils, hyacinths, and azaleas . These flowers come in a range of colors and are relatively easy to grow, making them a great choice for novice gardeners. Color Options: Pansies are a great option for early Spring planting, as they can tolerate cooler temperatures and even light frosts. They come in a range of colors, from deep purples and blues to bright yellows and oranges. Tulips are also a classic Spring flower, with their iconic cup-shaped blooms in shades of pink, red, orange, and yellow. Daffodils are another popular Spring flower, with their bright yellow or white petals and distinctive trumpet-shaped centers. Hyacinths , with their fragrant, bell-shaped flowers in shades of purple, pink, and white, are also a great choice for Spring color. Azaleas, if you're looking for something with a little more drama, consider planting azaleas . These shrubs produce stunning, large blooms in shades of pink, red, purple, and white. They require a bit more care than some of the other Spring flowers, but the payoff is worth it. Color Combinations: Once you've chosen your plants, it's time to think about color combinations. You can go for a monochromatic look with shades of pink, purple, or yellow, or mix and match different colors for a more eclectic look. One popular color combination for Spring is pink and white . This creates a soft, romantic look that's perfect for a garden wedding or a backyard tea party. Some great flowers to consider for this combination include pink and white tulips, hyacinths, and azaleas. If you're looking for something bolder, consider pairing yellow and purple . This creates a bright, cheerful look that's perfect for Spring. Try planting yellow pansies or daffodils alongside purple tulips or hyacinths for a stunning contrast. Another option is to go for a rainbow of colors. Plant a mix of different Spring flowers in shades of pink, purple, yellow, and orange for a bright and playful look. This works especially well in larger flower beds, where you have room to mix and match different colors and textures. Tips for Successful Planting: Once you've chosen your plants and color combinations, it's time to prepare your flower beds. Start by removing any dead plants, weeds, or debris that may have accumulated over the winter months. Then, loosen the soil and add some compost or organic matter to help improve drainage and fertility. Next, it's time to get planting! Make sure to follow the planting instructions for each type of plant and give them plenty of space to grow. Some plants, like tulips and daffodils, need to be planted deeper than others, so it's important to know what you're working with. Lastly, water your new plants regularly, especially during the first few weeks while they're getting established. One thing to keep in mind is that Spring weather can be unpredictable, so be prepared to protect your plants from late frosts or unexpected freezes. Cover them with blankets or tarps if necessary, and be sure to remove the covers during the day so they don't overheat. Another tip for a successful Spring color change is to plan for continuous blooming throughout the season. Choose plants with staggered bloom times so that there's always something in your flower beds to enjoy. And don't forget to deadhead your plants regularly to encourage more blooms and keep your flower beds looking tidy. In Conclusion: In addition to adding color to your yard, Spring planting can also be a therapeutic and satisfying experience. It's a chance to connect with nature and get your hands dirty, and the end result is a beautiful and inviting outdoor space that you can enjoy all season long. So what are you waiting for? Grab your gloves, your trowel, and get ready to create a colorful Spring landscape that will brighten up your days and nights!
Landscaping is an excellent way to increase the value of your property, and it can be a wise investment if you're looking to sell your home or just want to improve its overall aesthetic appeal. In fact, studies conducted by the National Association of Realtors have shown that a well-landscaped property can increase in value by as much as 10%. By designing and maintaining a landscape that creates a welcoming atmosphere, you can make your property more attractive to potential buyers and boost its curb appeal. This article will delve into the many ways that landscaping can add value to your property. Create a Focal Point: Adding a stunning focal point to your front yard, such as a water feature, a tree, or a statue , can create a memorable impression on potential buyers. A well-chosen and strategically placed focal point can draw the eye and create a sense of interest and wonder, enhancing the overall appeal of your property. Make sure to choose a focal point that is appropriate for the size and style of your property and complements the surrounding landscape. Create Outdoor Living Spaces: A beautiful outdoor living area, such as a deck, patio, or outdoor kitchen can increase the usable square footage of your property and create a great space for entertaining. Outdoor living spaces are becoming increasingly popular, and potential buyers are willing to pay more for a property with an attractive and functional outdoor area. They also provide an attractive space for homeowners to entertain guests or relax, which can be a major selling point for potential buyers. Install a Water Feature: A water feature such as a fountain, pond, or waterfall can create a peaceful atmosphere and increase the property value. The sound of flowing water can mask unwanted noises and create a calming environment, which can be especially attractive to potential buyers. Add Outdoor Lighting: Outdoor lighting can highlight your landscape and create an inviting evening ambiance. Furthermore, outdoor lighting can highlight the home's architecture, create a welcoming atmosphere, and provide safety and security. This can make your property more attractive to potential buyers and increase its value. Incorporate Colorful Native Plants: Choose a mix of perennials and annuals that are well-suited to the local environment to add color throughout your landscape, providing an eye-catching aesthetic. Colorful native plants not only add visual interest to the landscape but also require less maintenance and are adapted to the local climate and soil, saving you time and money on maintenance costs. This can increase the property's value as potential buyers are attracted to an eye-catching landscape that is easy to maintain. Plant Trees and Shrubs Strategically: They provide shade in summer, reduce wind in winter, regulate temperature, and save on energy costs. Additionally, they act as a sound barrier, reducing noise pollution and creating a peaceful, and private atmosphere. Add a Fence or Gate: Adding a fence or gate to your property can enhance its value in multiple ways. For one, it can provide increased privacy and security, which is an attractive feature for potential buyers seeking a sense of seclusion and exclusivity. In addition, a well-designed fence or gate can improve the property's aesthetic, increasing its curb appeal. Lastly, it can add functionality such as creating a secure area for children or pets to play in, which can also make the property more desirable to potential buyers. Incorporate Raised Beds: Raised beds add depth and dimension to your landscape and provide an ideal solution for gardeners with poor soil. They also create a more organized and visually appealing garden that can increase property value. Install an Irrigation System: Installing an irrigation system can increase the value of a property by allowing homeowners to maintain a healthy and attractive lawn, trees, and plants even during drought conditions. It saves time, money, and water and helps prevent soil erosion and water runoff, reducing the cost of maintenance and repairs over time. Properties with efficient irrigation systems will become more valuable as water becomes scarcer and more expensive. Maintain a Well-Manicured Lawn: A lush and green lawn is the foundation of your landscape and enhances the beauty of your property. Regular maintenance such as mowing, edging, fertilizing, pruning, weeding, and cleaning up debris will ensure that your landscaping looks its best and is a valuable asset for your property. Potential buyers are more likely to be attracted to a home with a well-kept landscape, which can help increase the property value. In conclusion, landscaping can increase the value of your property in many ways. A well-designed and maintained landscape can enhance curb appeal, create outdoor living spaces, improve energy efficiency, reduce noise pollution, and significantly increase property value. Therefore, it's essential to invest in landscaping if you want to maximize the value of your property.

As warm-season lawns go into dormancy during the cooler months, your lawns can suffer from dieback or winter stress. That can lead to thin, bare patches or a dry, straw-like appearance to your lawn and lose its lush green color. Therefore, if the cold weather has beaten your lawn in the winter months, keep reading to know how you can recover it. Why Does Your Lawn Suffer from Winter Dieback? Your lawn could be damaged by wear or burned by frost when temperatures are extremely cold. Take note that it will also not self-repair while it is dormant. Heavy shade because of the sun’s lower position could also contribute to dieback, particularly in the lawn’s first season. Remember that a lawn’s shade tolerance is low in winter, even when you have cool-season grasses. As the lawn matures yearly, you’ll slowly encounter less winter dieback as long as you keep it healthy. Easy Ways to Revive Your Dormant Grass Fortunately, there are some simple, practical tips to help you revive your dormant grass to its top condition. Here are some of them: Get rid of dead grass and debris Ensure to clean up any leaves, tree branches, and other debris before starting the process of reviving your dormant grass. Remove any shrubs and plants that did not survive the winter and trim any overgrown branches to enable new growth. Aerate the soil Excessive foot traffic, snow, and heat can damage the soil, making it difficult for the roots to get the water and nutrients it needs to thrive. Use a plug aerator or poke holes in the lawn to aerate the soil and get it in top condition again. Eliminate the weeds Pull out any weeds you see popping up. If it’s too much, you can use a weed spray. But if you dislike using harsh chemicals on your lawn, try a homemade version. That must be done before fertilizing or watering the lawn, as you don’t like the seeds to continue growing. Reseed Before reseeding, all frost should be thawed, and the soil temperature must be about fifty to sixty Fahrenheit. If you have a bigger lawn, you can use your hands to scatter the seeds evenly or pick a mechanical seeder. Remember that these seeds should be watered regularly so they can grow. Fertilizer Fertilizing your lawn is crucial, even though it’s important to use the most suitable fertilizer. Do a soil test to determine what fertilizer your lawn needs. If you’re not confident, you can ask a professional lawn service to help pick the perfect fertilizer for your soil. Hydrate it Dallas’ arid climate needs you to water your yards at least twice a week. At least an inch is good, but do not overwater! Too much water will damage your struggling grass trying to come out of dormancy. It’s more critical to water less and deeply so the roots receive the moisture they need. You can use our Hunter Irrigation System, designed with the highest quality materials to last through the wear and tear of any irrigation system design. They’re simple to install and need less maintenance. Maintain A beautiful lawn needs regular upkeep, particularly during winter. Generally, healthy grass length must be about three inches, so it does not dry out. What’s more, it should be mowed regularly. You should also avoid adding fertilizer too often, as it can result in weed growth and pest infestations. Remember that reviving dormant grass doesn’t happen overnight. Returning your lawn to its former glory takes care, patience, and time. Now, your lawn care routine is ready for any season! We wish you the best of luck!